Microsoft Sharepoint Web Parts
Bullet Graph Gauge Sharepoint Web Part
Installation Instructions:
- download the Bullet Graph Web Part Installation Instructions (PDF file, see above)
- either install the web part manually or deploy the feature to your server/farm as described in the instructions.
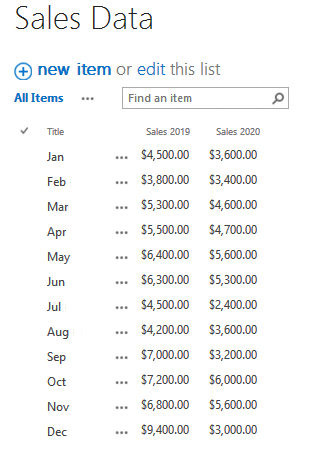
- Either adapt an existing Sharepoint List or create a new Sharepoint List to store the data to be gauged.
Also optionally define a suitable List View for the List if you want to sort or filter the data in a specific way.
The list should include a
- column to hold the actual data value(s) to be charted (see Actual Value List Column Name setting below).
The column should be a numeric type (Number or Currency).
- an optional column to hold the reference (target) data value(s) to be used (see Reference Value List Column Name setting below).
- Configure the following Web Part properties in the Web Part Editor "Miscellaneous" pane section as needed:
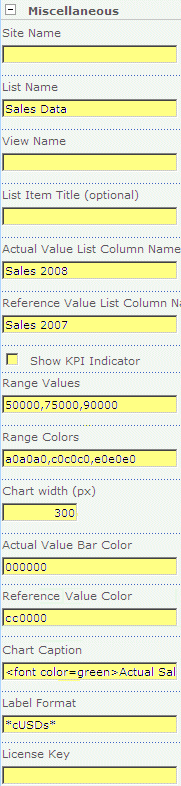
- Site Name: Enter the name of the site that contains the Sharepoint List containing the data to be charted.
- leave this field empty if the List is in the current site (eg. the Web Part is placed in the same site)
- Enter a "/" character if the List is contained in the top site
- Enter a path if the List is in a subsite of the current site (eg. in the form of "current site/subsite")
- List Name: Enter the desired Sharepoint List containing the data to be charted.
- View Name: Optionally enter the desired List View of the list specified above. A List View allows you to specify specific data filtering and sorting.
Leave this field empty if you want to use the List default view.
- List Item Title (optional): if you leave this field empty, all the items contained in the specified Sharepoint List will be automatically summed up. If you rather prefer to chart an individual List item instead of the sum of all List items, specify the Title (eg. the value of the "Title" field) of the desired list item.
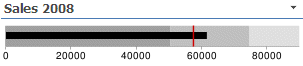
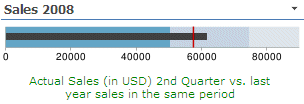
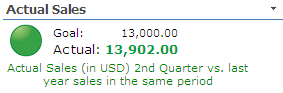
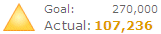
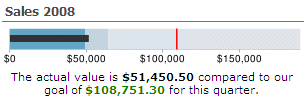
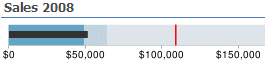
- Actual Value List Column Name: enter the Sharepoint list column name of the column containing the actual data to be charted. This value is displayed as the featured measure (black bar)
- Reference Value List Column Name: optionally enter the Sharepoint list column name of the column that contains the comparative reference measure (or target) data to be displayed. If present, this value is displayed as a red vertical bar.
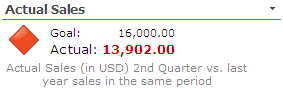
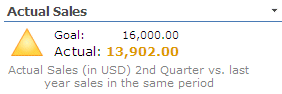
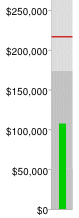
- Graph Type: choose either the Bullet Graph (horizontal or vertical) or the KPI Indicator display option.
- Reverse KPI Indicators: displays the KPI indicators in reverse order (eg. low value=green, high value=red)
- Range Values: enter the values for the 3 data ranges representing the qualitative ranges (as eg. "bad, satisfactory, good" or "red, yellow, green"). These values should be chosen to fit the actual data value. Separate the 3 values by commas.
- Range Colors enter the RGB color values for the 3 qualitative ranges, separated by commas.
- Chart Width: enter the desired width of the Bullet Graph Chart in pixels
- Bullet Graph Bar Width: enter the desired width of the Bullet Graph bar in pixels (Default=7px)
- Center Chart: optional center the Bullet Graph horizontally in the available space
- Actual Value Bar Color: enter the desired RGB color value of the actual data value being gauged (Default:black).
- Reference Value Color: enter the desired RGB color value of the reference value being gauged (Default:red).
- Chart Caption: enter an optional chart caption. You can use embedded HTML tags if needed and also embed the actual value and the reference value via the {actual} and {reference} placeholders.
Example:
The actual value is ${actual} compared to our goal of ${reference} for this quarter.
- Label Format: enter an optional format string to format the axis labels. A detailed description of the available format options can be found in the online Google documentation.
Example:
format the numbers as USD currency values (cUSD ) using decimal group separators (s):
*cUSDs*
- Localization: allows to change/localize the following two terms used by the KPI indicator:
Goal;Actual
- License Key: enter your Product License Key (as supplied after purchase of the "Bullet Graph Web Part" license key).
Leave this field empty if you are using the free 30 day evaluation version.
|
|
Technical Support Contact Information
If you find that you cannot resolve an issue using the above tools, our Technical Support staff will be ready to handle your technical support needs. You can reach our staff by phone or by email.
Phone: +41 (0)62 823 75 75 (9am - 5pm GMT)
Fax : +41 (0)62 823 75 74
Email: [email protected]
© 2026 AMREIN ENGINEERING AG


 Our dealings with Amrein have been very positive.We use the weather web part which we rate highly.


 Web Part Installation Instructions