f
10/8/2009 08:54 | I create the folder in imagelibrary but i can't use the folder in webpart? |
|
Juerg
10/8/2009 18:44 | if you want to only rotate images contained in a Library folder, please specify the �List Name� field as follows:
Your Image Library/Your Folder
Please note that the web part currently cannot access folders within folders (eg. subfolders). |
|
Centering the image???
11/7/2009 16:59 | We need the image to always be centered in the web part, like the default picture web part from MS. Is there a qucik to way to do that ?? |
|
Juerg
11/9/2009 11:22 | we now have added a new �Image Alignment� property. |
|
Blaze Lewis
11/12/2009 22:34 | I have done as described but when I hit the ADD web-part and add that web-part I instantly get an error that disables the page and leaves you in a state that says:
"The "AEImageRotator" Web Part appears to be causing a problem. Request for the permission of type 'Microsoft.SharePoint.Security.SharePointPermission, Microsoft.SharePoint.Security, Version=12.0.0.0, Culture=neutral, PublicKeyToken=71e9bce111e9429c' failed."
I'm the Administrator... What am I doing wrong? |
|
Juerg
11/13/2009 17:24 | Blaze,
please move the web part DLL from the BIN directory into c:\windows\assemby.
Do this operation using Windows Explorer either directly at the server or via RDP (not via a newtwork share).
|
|
Kat
11/24/2009 18:10 | I had the original version of this loaded. I removed the dll from all the web servers, added it again, and then added the webpart fresh again but I'm still not getting the Image Alignment option. Do I need to reboot between removing the dll and adding it again? |
|
Juerg
11/24/2009 18:51 | Kat,
if you put the DLL into c:\windows\assembly you'll also need to do an "iisreset". |
|
Kat
11/24/2009 22:35 | I got the webpart to update. But now I can't get it to display an alt tag. I've put text in the Title and Description fields but they show on the page not as alt tags. Title showed below the picture but description showed to te right of the picture. |
|
Philipp
11/26/2009 06:36 | Hi,
What is the restriction for the free one?
Regards |
|
Juerg
11/26/2009 12:23 | Philipp,
there are no restrictions on this web part.
The licensed version includes technical support and free upgrades.
|
|
Juerg
12/1/2009 14:22 | Kat,
we now have updated the web part to show the Title and Description info (if present) in the image ALT tag. Please re-download the Zip file and replace the DLL. |
|
Jeremy Bond
3/19/2010 00:26 | Any plans to add a timer control to webpart so the images could cycle on a timer rather than on a page refresh? |
|
Juerg
3/19/2010 12:16 | Jeremy, you might consider our Slideshow Web Part which cycles based on a timer. |
|
Jeff
4/16/2010 15:32 | Am I going to have to add the license key every time I use this webpart? I plan on using it on several pages and do not wish to have to add the key every single time |
|
Juerg
4/16/2010 16:06 | Jeff,
you actually have the following 2 additional options (only the second option can be used if you manually installed the web part) to enter the license key (see also last section in the Installation PDF file which can be downloaded at /apps/page.asp?Q=5780 ):
WSP Solution Deployment:
Add the License.txt file (as supplied by us) to the Solution at the following location:
c:\Program Files\Common Files\Microsoft Shared\Web Server Extensions\12\template\features\AEImageRotatorWebpart
Manual Deployment:
Add the License Key to your web.config (typically found at c:\inetpub\wwwroot\wss\virtualdirectories\80) <appSettings> section as follows:
<appSettings>
<add key="AEIR" value="AEIR-x-xxxxx-xxxxx-xx-xx" />
</appSettings>
Replace the "x" characters with your actual key values.
Please note that this method makes the key available to each Sharepoint application. |
|
Shawn
5/21/2010 22:21 | How does the web part index the image library? In other words, if I want to set an order to my images how do I do that? |
|
Juerg
5/25/2010 13:40 | Shawn,
either directly set the sort order of your image library�s �All Pictures� default view (by navigating to your �Picture Library Settings�) or create a new View, where you then define the desired sort order.
You then should specify that view in the web part�s �View Name� property. |
|
Keith
8/25/2010 17:51 | If I have an image library with several folders and sub folders, will this webpart pull from all of them if I set my default view to Flat (no folders)? |
|
Juerg
8/26/2010 14:20 | Keith,
if you just specify your Picture Library name in the web part�s �List Name� setting, all pictures will be available including the picures contained in folders within your Library. |
|
danelia
9/29/2010 17:51 | Hi, Juerg. First one I want to thanks you for share this with us.I have a trouble when I tried to charge the picture.Appears to me the next error:
DSC00001.JPG:'Picture Height' and/or 'Picture Width' column not selected or empty!
Regards for you an all your team. |
|
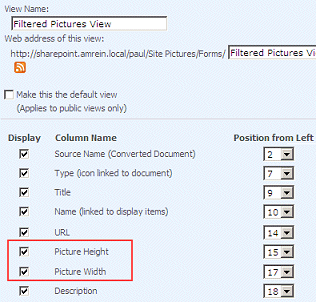
Juerg
9/29/2010 18:01 | Daniela, you need to check both the "Picture Height" and "Picture Width" columns in your Sharepoint Library for your view: |
|
Jacek
11/9/2010 19:56 | Hi, I installed webpart according to the instruction, but when I try to add webpart I dont see this webpart on the list (same with Dilbert and weather webpart). |
|
Juerg
11/10/2010 10:52 | Jacek,
did you make sure to add the feature to the top site of your Sharepoint application (as opposed to the Central Administration site) ? |
|
Jacek
11/12/2010 19:28 | Juerg,
thank you so much, this was the problem.
I did it only on Central Admin.
It works great now, I have to order couple of webparts. |
|
Wayne
11/17/2010 17:59 | Will this work on an annoymous site? We have tried other webparts like this but have been unable to find one that works for anonymous users. |
|
Juerg
11/17/2010 18:06 | Wayne,
yes, this will work, as long as anonymous read access is granted to the Sharepoint Picture Library used in conjunction with the Image Rotator.
|
|
Patty
11/30/2010 01:56 | This says the if a URL column is found in hte list it will be used as a hyperlink that opens in a new browser window. I definitely get the hyperlink, but it doesn't open in a new window - it opens in the existing window. I've tried with IE, Firefox and Safari. I'm using SharePoint 2010. Need some help with this. |
|
Juerg
11/30/2010 12:05 | Patty,
the description was inaccurate and the link always opens in the existing browser window. We have thus added a new �Open Links in new window� web part setting which rectifies this. Please re-download the updated Zip file, extract and then replace the DLL, followed by an �iisreset� command if you placed the DLL in c:\windows\assembly. |
|
Shira
3/21/2011 09:46 | I get an error message in the web-part :"DSC_0206.jpg:'Picture Height' and/or 'Picture Width' column not selected or empty!" althogh it has parameters. and the size of the image is not chaged no matter which numbers I write |
|
Juerg
3/21/2011 11:22 | Shira,
are you using a Library �View� (eg. did you declare a �View� in the web part�s �View Name� field) ?
If yes, please make sure to select the two columns (as shown in the picture a few posts above) in your View. |
|
Marsha
5/23/2012 19:26 | Image rotator transitions smoothly when monitor is set to 100% magnification. When it's at 75% or 125% there is a very noticable jerkiness between each image transition. How do we resolve this? |
|
Juerg
5/25/2012 10:48 | Marsha,
could it be that you actually are testing the �Banner Rotator� web part (please see Banner Rotator Web Part) ? |
|
Jay Bee
9/5/2012 02:35 | Please explain to me how this is free?, its not free... you are charging for everything that you have stated that is free.... you dont know what free is! thieving, lying, good for nothing.... |
|
Juerg
9/5/2012 18:30 | Jay Bee,
some of our web parts are indeed offered free of charge, but others are not. The "free" download at the top of this page refers to the 30 day evaluation version and might be misleading. If you send us an e-mail to [email protected], we'll return you a complimentary copy of the Image Rotator web part. |
|
Tammy
1/5/2013 04:17 | If I apply at that point I get No Sharepoint List Defined. Then when I try to add a list name the message changes to Sharepoint list not found. I've tried it with the http, without, with / and without. Ideas? |
|
Juerg
1/7/2013 15:48 | Tammy,
just enter the picture library name (without any path and domain information) in the web part's "List Name" setting.
Is the picture library defined in the same site as the page that hosts the web part ? |
|
Umeeke Napier
8/20/2013 16:30 | Can the image rotator web part or anyof the other Amrein web parts work with pages, or are they restrictive to working with lists only? |
|
Holt Satterfield
11/8/2013 02:39 | any chance this will be available for SharePoint 2013 Office365? |
|
Juerg
11/8/2013 14:23 | Holt,
we have now released the Office365 version. |
|
an
3/28/2014 13:21 | Hi there - could this be used to rotate profile pictures as specified in a List? |
|
Juerg
3/31/2014 12:56 | an,
the �Image Rotator� web part actually only works with Sharepoint Picture libraries, but you could check out the �Spotlight On� web part (see /apps/page.asp?Q=5738) which works with either lists or picture libraries or the "User Spotlight" web part (see /apps/page.asp?Q=5783) which displays users tkaen from the Sharepoint User Profile Store. |
|
Roberta Freese
8/29/2014 16:32 | Hi, great web part, we are enjoying the full suite. A question, which web part would you recommend, if not this one, to set up an image rotation based on the Publishing Rollup Image column added to a blog site's posts list? With or without being clickable since the blog site posts list has a custom display form.
Thanks for the great web parts!
Roberta |
|
Juerg
9/2/2014 17:25 | Roberta,
the Image Rotator web part does not support publishing rollup images, but the Banner Rotator web part does (see /apps/page.asp?Q=5790).
You then would need to enter the below into the web part�s �List Name� setting:
Posts|PublishingRollupImage|400|250
(where the 2 numbers are the desired width and height of the banner area). |
|
Anis
11/1/2015 07:00 | Hi Juerg,
Will it be possible to configure this webpart in listview, here each listview item will have list of images, and this web part should work against the images based on item id, pls advise the way forward? |
|
Juerg
11/3/2015 15:54 | Anis,
are the images defined as list item attachments ? |
|
Jenny
11/11/2015 09:48 | Is it possible to define how many of the characters from the description field that will be visible in the web part? We have a description field that is very long and we'd like to just show the first 200 characters in the web part. If the users want to see the whole text, they'll have to click on the link to the item. |
|
Juerg
11/15/2015 16:11 | Jenny,
we have now added the new "Max. nbr. of words displayed" web part setting which allows to truncate the caption to the number of words specified in this setting.
Please re-download the updated Zip file and then update the web part solution. |
|
Catherine
12/2/2016 14:19 | We have the solution installed and it has been working without any problem. Yesterday it started failing with this error:
Web Part Error: Solution failed validation. Correlation ID: 951cbd9d-60f8-3000-bf4f-1187af6d9597.
How can we resolve? |
|
Juerg
12/2/2016 14:24 | Catherine,
Microsoft withdrew support for �sandbox� web parts earlier today (December 1, 2016).
Please download the new version of the Banner Rotator web part from the Sharepoint App Store at:
https://store.office.com/en-001/app.aspx?assetid=WA104380434&sourcecorrid;=fe6fb487-4844-4f48-af9d-633421e4dba4&searchapppos;=0&ui;=en-US&rs;=en-001&ad;=US&appredirect;=false
Please note that you then will be able to use your existing license key(s). |
|
Salik Anwar
4/28/2017 11:23 | Not able to configure Image Rotator Web Part on O365 Sharepoint. Need your help.
in Miscellaneous setting:
Site - /sitename/subsite (where picture library is there)
List - /pic library name
Rest settings by default.
Error msg is List '/Rotater' does not exist at site with URL 'top level site path"
Appreciate your help
Thanks,
|
|
Juerg
4/28/2017 12:18 | Salik,
please enter the list name without the �/� prefix, eg. just enter the name of the list. |
|
Chris Dittrick
3/4/2020 15:15 | How do I add a semi-transparent text box as shown in your "7th Avenue NYC" example image abox? Looking to add that text box feature. Also, what is the css for adjusting the text box width? Thanks! |
|
Juerg
3/4/2020 16:04 | Chris,
to add the text into the semi-transparent box, please select the �inside� �Caption Alignment� web part setting and then also add the below into the �Caption CSS Style� setting:
font:14px Segoe UI Light;color:white;background:rgba(100,180,230,0.85);width:300px
(adjust the transparency color and width as needed). |
|
Marc
9/8/2021 19:53 | We have a licensed copy of this web part on a client's SharePoint Online (Microsoft 365) intranet. The web part has stopped working, none of the settings for a license key or pointing to an image library are shown when editing the web part's settings. Need help ASAP. |
|
Juerg
9/8/2021 19:58 | Marc,
we have now fixed this issue.
Please hit Ctrl-F5 to refresh the page (bypassing the browser cache). |


 Great products and excellent support!


 Web Part Installation Instructions
 Post a Comment