Octopus
9/22/2009 20:43 | Hello guys, this webpart is awesome!
However, I'm having the following problem: when I click the pin icons on the map, the Info Buble shows information of other row of the list, not the one it relates to. Any clue? |
|
Octopus
9/22/2009 20:53 | Hello again,
The webpart seems to check the existence of the view (it does not let you insert a view name that does not exist), but it always takes the default view (All Items) for the map. Am I doing something wrong? |
|
Juerg
9/24/2009 11:41 | Octopus,
we have now fixed a problem which caused all the bubble infos to be offset by one entry. Please re-download the ZIP file, extract and replace the DLL. Please also do an IISRESET if you deployed to the GAC. |
|
Joshua
10/2/2009 01:44 | Hi - I've just tried installing this web part but after adding it to a page I get the following error.
The "AEGeoMapper" Web Part appears to be causing a problem. Request for the permission of type 'Microsoft.SharePoint.Security.SharePointPermission, Microsoft.SharePoint.Security, Version=12.0.0.0, Culture=neutral, PublicKeyToken=71e9bce111e9429c' failed.
Any ideas on what I'm doing wrong? |
|
Juerg
10/2/2009 10:07 | Joshua,
can you check if the trust level in your web.config file is set to �WSS_Minimal� ?
If so, please set it to �medium� as follows:
<trust level="WSS_Medium" originUrl="" /> |
|
Aby
10/22/2009 18:27 | Do we have to click the icon for the details. Can't the mouse over shows the details ? |
|
Juerg
10/23/2009 15:01 | Aby,
we have now added the Tooltip feature. Please re-download the Zip file, extract and replace the DLL. |
|
aby
11/9/2009 14:50 | Thanks Juerg, Another question : Why the links won't work from the Info Bubble.? I mean, from the bubble info, I have to open a website. It shows errors. ( here info Box name is empty) But if I give the Info Box and click the same link there it works... |
|
Juerg
11/11/2009 16:39 | aby,
can you send us the HTML source for that page to [email protected] for analysis ? |
|
OPCadmin
12/15/2009 00:39 | Great webpart! I am having a problem with the Info Box. It doesn't show anything. I can display the same info (column) in a tool tip but nothing shows up when I use it in the info box.
Second issue: any chance to have a connection between the source list and the map webpart like you have in a google map webpart? For example when I select a row a bubble will appear on the map?
Thanks! |
|
Myles Milner
2/18/2010 20:34 | Installed the web part according to the directs but I never get a map to show. What am I missing? |
|
Juerg
2/19/2010 11:09 | Myles, Do you get an error message (eg. were you able to successfully install the web part) ? Can you give the details of the web part configuration settings ? |
|
Chris
3/9/2010 20:44 | Is it possible to use this Webpart on sites with https:// (SSL) ? I saw that the other google-webpart already has this option... |
|
Juerg
3/10/2010 13:55 | Chris,
the Google Map API currently does not support access via https. Thus your users will get the �unsafe� message from their browser unless they add the URL to their �safe� setting.
|
|
Leonard
3/11/2010 13:39 | I incurred the same problem as Octopus, but got it working after referring to a different support blog. Don't know why this is a little difficult to get off ground, but I am only a weekend "web guy" for my company anyhow.
However, I was wondering if there is a way to have multiple site highlighted at once and when you print the page, keep them visible so that they will print. Even when I highlight one location and try to print it, the pop-up does not show up.
Good solution for us though, if we could get this to work becasue we have several dozen job sites going at once and we have single staff member plot these in a map program on their computer. Of course they are the only one that can view it so they print it out for the job folder. Very outdated process. |
|
Juerg
3/11/2010 18:52 | Leonard, the Google Maps info bubble pop-up is indeed missing in the print-out. It is also not possible to have more than one open pop-up on the map. This is caused by the way the Google Maps API is designed, so we are not able to correct this. Is anyone aware of a possible workaround ? |
|
John
3/22/2010 19:26 | Is there a way to adjust the size of the yellow box below a map ithouth adjusting the size of your Popup bubble? I need to a bigger Popup bubble but prefer to have no yellow box below the map at all. |
|
Juerg
3/23/2010 15:55 | John,
you can turn off the yellow info box by setting the "Info Box Window Height" to zero. You then can include the "Description" column (or any other columns) in your "Info Bubble Template" setting. |
|
John
3/24/2010 19:23 | Unfortunately, if I do that then the Popup bubble is too small to fit all of the info in it without adding a scroll bar. I want a big enough bubble (the data I have shown is formatted and needs to be large for my use) to show all of the data at one time, but have no need for the yellow box at the bottom at all. Is there no way to solve this issue?
John |
|
Juerg
3/25/2010 11:55 | John,
we've now added the new "Info Bubble Height" web part setting which allows you to set the desired height of the info bubble (set it to "0" if you want to set it automatically).
If you also want to override the default 225 pixel info bubble maximum width, please add the AEGM_BubbleWidth setting to your web.config's appSettings sections as described in the "Installation Instructions" above.
Please re-download the updated Zip file, extract and replace the DLL (followed by an "iisreset" command if the DLL is placed in c:\windows\assembly) |
|
Gunther
4/21/2010 15:56 | Juerg,
So when do you plan on adding web a part connection feature to this web part? I am excited to use this feature. |
|
Juerg
4/21/2010 16:46 | Gunther,
we've added the web part connection feature on February 8 (see description of feature above). |
|
Gunther
4/21/2010 19:08 | Sorry, I was being kind of vague. I was referencing the features from this post that I had in the "Google Map Webpart" page. -
"Gunther
4/16/2010 05:43 It would be great to connect the map web part to another web part on a page, and have the map web part display each list item in the connected web part as the pin. In addition when you select a item in the list of the connected web part then have the corresponding map pin show the bubble information. It would be nice to be able to hover over the pins and have the bubble pop-up as well. Here is an example of what I am wanting to do- I have a web part page that displays the basic company information. It has a webpart displaying a filtered list from a "company sites" list that shows the sites for the company. I want to show these sites on the map, and have the behaviour described above. " |
|
Juerg
4/22/2010 14:22 | Gunther,
we 've now added this feature to the GeoMapper web part as follows:
if the web part both is
- connected to a Sharepoint List and also
- references the List via its "List Name" parameter,
all the locations contained in the List will be shown on the map.
If the user selects a List entry, the map will show the selected location centered with the info bubble opened.
Please re-download the uploaded Zip file and replace the DLL. |
|
J�rg
4/25/2010 00:24 | How do I connect it to another webpart that is displaying a filtered list?
|
|
Juerg
4/27/2010 12:15 | J�rg,
create a Web Part Connection between the Sharepoint List and the Google Map web part as follows:
- switch the page to "Edit" mode
- Choose "Connections" from the List Web Part "edit" menu
- Choose "Provide Row To"
- Select the Google Map Web Part in the menu
|
|
Radhika
8/7/2010 12:58 | It does not have address and city column lookup like the Google map web part? So, if my list is dynamic, I have to use geocoder api to get the lat and log right?
|
|
Juerg
8/9/2010 10:52 | Radhika,
we did not inlude this feature since Google imposes some limits for excessive Geocoder queries within a short time frame (which be be the case if you have a huge List containing many items). |
|
Ameha
9/2/2010 17:45 | I am using Geo Mapper web part, on the bubble window I want to display a link that points to a document in my document library. The link opens documents when I click it on the list, but it does not work on the bubble window. Any help is appreciated on this. Thanks |
|
Juerg
9/2/2010 19:59 | Ameha,
do you include the link dynamically via a column in the "Info Bubble Template" setting ? Is that column of type "Hyperlink" and directly containing the document URL or is the link manually embedded in a text column ? |
|
Ameha
9/3/2010 15:41 | Juerg, yes I included in the "Info Bubble Template setting". I tried the link both manually embedding in a text column and on a hyperlink column type. For this I just use a simple Google.com URL for both links.
When I click the link for the embedded text column for the simple Google.com link it takes me to the following link: http://MySite.com/%22http://www.google.com/%22.
But for the hyperlink column type it does not even consider it as a link it simply shows the http://www.google.com text with out a link.
|
|
Juerg
9/3/2010 17:13 | Ameha, there is indeed a problem with links embedded in a rich text column, but a link entered into a List column of type "Hyperlink" should actually work fine.
Can you check if the List column type of the column embedded in your Info Bubble template is of type "Hyperlink" ? |
|
Ameha
9/3/2010 21:33 | Yes, the column is of type hyperlink. I am just seeing the "http://www.google.com" and the URL description next to it just as a text on the bubble window. |
|
Juerg
9/10/2010 18:57 | Ameha, the below screenshot demonstrates both a hyperlink embedded in a rich text field and also a link taken from a List column of type "Hyperlink or Picture":
 . .
Are you using a recent version of the web part ? |
|
Ameha
9/10/2010 20:23 | I am using Version 1.1.1.
On my side the link does not still work. Please advice what I should do.Thanks. |
|
Juerg
9/13/2010 09:38 | Ameha, we added the Hyperlink support in version 1.1.5 (the current version is 1.1.12). To update, please re-download the Zip package, extract and then replace the DLL (followed by an "iisreset" command). |
|
Cryptanalyst
9/13/2010 19:04 | I am very impressed with this web part; I was referred here from the Google Earth Webpart because with this one, I can map several locations at a time. The problem is, I need use Google Earth and not Google Maps. Do you have a product like that? |
|
Ameha
9/14/2010 15:43 | Juerg, I do not understand where is the zip package? Do we have to pay for the latest version? Please send me the steps how to gracefully update the new version. I was wondering was the web part verson 1.1.1? We bought the web part last June a couple of month ago and how come the version become 1.1.12. |
|
Juerg
9/14/2010 16:02 | Ameha,
just use the "Download" button on top of this page to download the current version (it is actually a Zip file). Your version 1.1.1 had actually been released in early February (in June, the version was already up to 1.1.7). |
|
Juerg
9/14/2010 17:27 | Cryptanalyst, The Google Earth web part actually is not able to display the location for all entries in a Sharepoint List but you can use a KML file containing all the placemarks instead, as described in the �KML� section on the "Google Earth" web part page (see section 4) |
|
Ameha
9/15/2010 22:24 | Juerg, the Hyper link functionality works perfect after I upgraded the web part to the new version(1.1.13).Thanks for the support. |
|
max
10/13/2010 15:29 | Juerg, great job. Could it be enhanced to enable the download of a file corresponding to currently selected (and displayed) items? I mean kmz and/or other file format to be used with offline devices such as Garmin, TomTom, etc.
|
|
Anco
11/30/2010 21:27 | Just downloaded the trial of the Geo Mapper Webpart. This webpart seems to perfectly fit the wishes of my customer. Tried configuring the webpart but the only result I get is all my coordinates on one line above the map. I also sent an email with some screenshots to your support box. |
|
Juerg
12/2/2010 16:05 | Anco,
please make sure to specify your Latitude and Longitude columns to be of type"numeric" to allow for proper number conversion in a Sharepoint installation that uses a non-English locale. |
|
Matt
2/10/2011 16:28 | Great control! Is it possible to overlay polygons on to the displayed map, i.e. MI Tab file? |
|
Juerg
2/11/2011 13:46 | Matt,
the Geo Mapper web part currently does not support Map Info TAB files. |
|
Matt
2/16/2011 17:07 | Hi,
Thanks for the response, is it possible to overlay any spatial files, GoogleMaps can display KML files to overlay a polygon?
Cheers.
Matt |
|
Juerg
2/17/2011 18:05 | Matt,
we can add the feature to be able to specify a KML file (either stored on an external web server or in a Sharepoint document library) if needed. |
|
Matt
2/18/2011 08:57 | Hi Juerg
I think that would be really powerful to be able to overlay polygons and points onto the GoogleMap.
If you could expose this functionality that would be fantastic!
Matt |
|
Juerg
2/25/2011 18:41 | Matt
we have now added the new "KML Overlay" web part setting to allow for a KML overlay file.
Please re-download the updated Zip file, extract and then replace the DLL, followed by an �iisreset� command if you placed the DLL in c:\windows\assembly. |
|
Mackaycc
3/24/2011 13:25 | Hi
Is it possible to display different colours of pin depending on a value on your list and if so, how?
Thanks |
|
Juerg
3/24/2011 19:56 | Mackaycc,
yes, by using the web part�s �Icon Column Name� setting as follows:
Icon Column Name:
use this option if you want to assign individual icons to each List entry (leave field empty otherwise to default to the icon set in the "Map Icon" option above) by placing the name of the List column containing the icon name to be used for that list entry. Enter the icon file names without the .png file extension (eg. if your custom icon is "myIcon.png", just enter "myIcon" into your List's icon column).
So for example you create a new �Pin� column in your Sharepoint List and enter the desired pin names into the fields.
The available pins can be looked up here: Preview |
|
Chris R
4/11/2011 17:02 | Juerg - I'd really like to be able to pull pinpoints based on city and country. Having to look up Latitude and Longitude create an extra manual step to populating the address list I'm using. I'd like to eliminate this step. What do you suggest? |
|
Eneko
4/23/2011 13:01 | Hi,
I just want to know if this webpart can be used just with the country or city as input data. We have a list with the country but not the latitude or longitude (and we don't want to input this data anyway). Is there a way to do that with this webpart or any other?
Thank you. |
|
Juerg
4/25/2011 14:37 | Chris and Eneko,
we have now released the new free companion �Geocoder� web part which allows you to automatically populate your Sharepoint List with the Latitude and Longitude coordinates based on the address data contained in your Sharepoint List. |
|
Terri
4/25/2011 18:14 | I would like to be able to connect the GeoMapper to your List View web part. Actually, to a list in the site hierarchy, but not on the specific site. (top level site has the list; sub-site has the GeoMapper). How can I get them to connect?
Also, how can I set the info bubble to not display the first item in the list on page load? I would like to show the map only. Then, if a user hovers over a pin, the info bubble will display.
|
|
Juerg
4/27/2011 17:04 | Terri,
Sharepoint (including SP2010) unfortunately does not allow to connect a web part to a standard List defined in another site in the site collection. Our �List View� web part does not support web part connections so you might have to either consider the Sharepoint Data View web part or look for a 3rd party List web part that both acts as a web part connection provider and can connect to a List in another site.
We could actually add an option to hide the Info Bubble when the user selects an entry via a connected List web part. You then could interactively open the bubbles when clicking on the pins (the web part currently is not able to open a bubble when hovering over a pin). Please note that if the web part is not connected, then all the pins from the underlying List are displayed (but none is yet selected). |
|
Jose Soria
4/28/2011 15:09 | Hi guys. I am using this and other google maps webparts and they are really as great as the support provided by Juerg and team to fix some minor issues and to adapt some specific requirements. Thanks!!! |
|
Romain
4/29/2011 10:23 | Hi, Is it possible to use this webpart for an intranet? I have error messages about the Google Maps API Key I've used.
Thanks |
|
Juerg
4/29/2011 10:41 | Romain,
yes, this is possible. Just enter the domain name of your Sharepoint intranet application when registering for the Google API key.
|
|
Romain
4/29/2011 10:51 | Hi again, I've made many tries but impossible to get a correct key... |
|
Romain
5/2/2011 10:36 | Hi, It finally works thanks to the help of Juerg. Thanks for the reactivity! |
|
FlyingTigerSon
5/19/2011 19:17 | I am using the trial on 2010 Foundation...I have an external content list (with empty Lat Longs) and was able to geocode and update this list. However, for some reason the map web part will not recognize the list, so I cannot display the data on the map. Any ideas why I cannot display data on the map from an External Content Type list? Cheers, looking forward to buying this if it works. |
|
Juerg
5/30/2011 15:22 | FlyingTigerSon,
the Geo Mapper web part should work fine with an SP2010 external list. Please make sure to enter the name of the external list into the web part's "List Name" field. |
|
FlyingTigerSon
5/31/2011 15:59 | Thanks Jeurg, I created a new page and added the two webparts and was able to connect to the ECT list. Fo some reason, the webpat that is on the page now wont recognize the ECT list. It is working now, not sure why the existing webpart cannot see it...but I got another page to work. |
|
FlyingTigerSon
6/10/2011 17:52 | I may have found a feature! OMG!
If I remove the value and leave blank, the value for Info Box Window Height, there is an error:
Info Box Window Height: This property requires a numeric value that is represented by single-byte characters (for example, '1').
If I type 0 for a value in Info Box Window Height, an error appears "Sharepoint List Not Found"
If I set it to -1 the box does not appear - which is exactly what i wanted.
So, although I found a workaround, it was not exactly clear. |
|
Vwj
7/13/2011 21:56 | I'm running SPF 2010 with the 30 day test version. I ran into some trouble trying to display locations from different continents/country at the same time. Even using the list views it doesn't work. Any ideas? |
|
Vwj
7/13/2011 22:25 | Correction, if I approximate and click where the location should be I get the bubble. Yet the Icon/Pin to display it is invisible. |
|
Vwj
7/14/2011 15:30 | Well I figured it out, turns out I had a typo and the "blue" pin doesn't work well. After changing it to another image all is well... |
|
Christoph
7/26/2011 20:38 | Hello - the webpart is getting really slow when using it with 500 or more Pins - is it possibel to make it faster? |
|
Juerg
7/29/2011 18:46 | Christoph,
this is a limitation imposed by the Google Maps interface. |
|
Fred
9/16/2011 20:54 | Google Maps API now supports SSL. When do you intend to update your mapping Web Parts to support this capability? Our site must run over https.
http://code.google.com/apis/maps/faq.html#ssl
Thanks,
Fred |
|
Juerg
9/21/2011 14:56 | Fred, we already updated the Google Map Web Part and also are currently in the process of updating the Geo Mapper Web Part. It will be made available in the coming weeks. |
|
Piero
9/26/2011 16:36 | Is it possible to show a picture in the info bubble template ? |
|
Juerg
9/26/2011 17:16 | Piero, yes, plase embed it using HTML as follows:
<img src="{yourColumn}" border=0 width=100>
assuming that yourColumn contains an URL pointing at a picture |
|
Jose Rivera
11/10/2011 23:06 | The Web Part works like a charm, but on the search, when I try to use the @ as a combo, the first time, the combo brings the values, but once selected, the map will not filter out and the combo will come up empty. This is in sharepoint 2010. |
|
Juerg
11/11/2011 19:52 | Jose,
we broke the search dropdown box feature in the most recent version.
This has now been fixed. To update, please re-download the Zip package, extract and then replace the DLL (followed by an "iisreset" command). |
|
Bill Ray
12/7/2011 13:49 | Hi, We are trialing your Geo Mapping web part that requires a google API key version 2 which has been offically depreciated. Do you have an update that will wor with V3? |
|
Juerg
12/7/2011 14:06 | Bill,
we recently made the new version available, which is based on the Google Maps API V3 (which does not anymore require a Google API key). Please download the new version from our web site at /download/AEGeomapperWebpartV1.2.zip, extract and then replace the DLL, followed by an �iisreset� command if you placed the DLL in c:\windows\assembly. |
|
Josh
1/26/2012 21:14 | I have replaced the dll file, and did the IIS reset but I am still seeing version 1.1.36. I am using the trial but could this be the issue? Also I am looking for a way to color code the google map. Is this possible with the KML features? Other than that this tool kicks butt! |
|
Joel
1/28/2012 13:29 | I've used Google Map Sharepoint Web Part to plot a single row from a List and it works great. The best part about Google Map Sharepoint Web Part is that it doesn't require Long/Lat as you can provide the fields containing the address details for the webpart to use.
I like Google Geo Mapper Sharepoint Web Part as it allows multiple plotting but the long/lat requirement is a show stopper.
We have thousands of member records and it's not plausible to look up the lon/lat details of each.
Is it possible to have Google Geo Mapper Sharepoint Web Part behave in the same way as Map Sharepoint Web Part by using existing field data? |
|
Juerg
1/31/2012 21:02 | Joel,
we actually have the free �Geocoder� companion web part (please see download link at the top of this page) which allows to automatically translate the address field(s) contained in your Sharepoint List to Latitude and Longitude and store the results back into your List. The web part only looks up the lat/lon for List entries that are missing this information.
|
|
Joel
2/1/2012 07:47 | Excellent. Thanks Juerg. It's working greta now. |
|
Juerg
2/1/2012 11:16 | Josh,
we recently have released version 1.2 of the Geo Mapper Web Part which uses the new Google Maps API V3.
Please download the new version Zip file from our web site at /download/AEGeomapperWebpartV1.2.zip, extract and then replace the DLL, followed by an �iisreset� command if you placed the DLL in c:\windows\assembly.
You can can use a KML file to define and color a specific region (defining the region with say polygons and shading the region with an opaque or semitransparent color). |
|
Daniel
3/12/2012 23:54 | I'm working with the 30-day to see if it will meet our needs. Is it possible to connect the bubble back to the list, such that if you click some text in the bubble it will open the item from the SharePoint list? |
|
OPCadmin
3/28/2012 22:27 | Question about the free "Geocoder". It works great and saves us a lot of time but it seems to be very sensitive to the address format. For example I get a Google Gecoding Error for this address:
1111 E. First St #E, Some City, CA 99999
where the # seems to be a problem. When I use this address in google maps it finds it correctly. Is there anything you can do about it or this is something on their side? |
|
Thomas
3/29/2012 11:43 | OPCadmin,
we can�t do anything on our side. Google maps is much more tolerant than the Google geo coding api.
|
|
Cecil
3/29/2012 20:05 | We have installed the previous version of GeoMapper on our MOSS 2007 farm and now want to upgrade to your newest version. I plan on using the command:
stsadm -o updatesolution -filename AEGeoMapperWebpart.wsp
After I do this, is there any other action I must take? Do I need to reactivate on the Site Collections?
We also have a couple of Web Front Ends. |
|
Juerg
3/29/2012 21:54 | Cecil,
the correct command actually is:
stsadm -o upgradesolution -name AEGeoMapperWebpart.wsp -filename AEGeoMapperWebpart.wsp
The only additional step will be to do an "iisreset" to flush the DLL cache. |
|
Jesse
4/11/2012 16:32 | I want to use custom map icons that I have already create. However, I can not figure out how to create a Map Icon Directory to reference.
I'm currently using the www.amrein.com/pins directory. |
|
Juerg
4/11/2012 16:42 | Jesse,
you can for example store your map icons in a folder beneath the Sharepoint _Layouts folder at:
c:\Program Files\Common Files\Microsoft Shared\Web Server Extensions\14\TEMPLATE\LAYOUTS\GooglePins
and then specify:
/_layouts/GooglePins
in the web part's "Map Icon Directory" setting |
|
Steve
5/7/2012 22:12 | Question about multiple lists. I can see where I can choose a list to view with the show list combo selection, but can I see multiple lists at a time? |
|
Juerg
5/8/2012 10:16 | Steve,
if you enter several list names from the actual site into the configuration field "List Name", separated by ";" and uncheck "Show List Combo" then the Geo Mapper web part rolls up these lists. |
|
John
5/15/2012 19:39 | Juerg,
If I want to use my own icon file locally in a Publishing site, would I still put it in the c:\Program Files\Common Files\Microsoft Shared\Web Server Extensions\14\TEMPLATE\LAYOUTS\. and would it get published with my site?
Thanks |
|
Casey
5/15/2012 20:09 | Having an issue with the "Info Bubble" and having a link. The link only works if its the full URL address when I'm using a reference to a Column in a list. When I try to code it with HTML
for example: <a href="{Pizza}">Pizza</a>
It won't work and gives me a messed up URL. Any help is much appreciated. |
|
Thomas
5/29/2012 11:04 | Casey,
Sharepoint List Hyperlink columns work. But in the info bubble template write only: {LinkColumnName} not: <A href="{LinkColumnName}">Displayname</A>. If you use a text column then the content of the column should be e.g.:
http://www.amrein.com,Amrein Engineering
Url and display text are separated by a comma. Without the display name (and without comma) the url itself will be used as display name. You can also append "/new" or "/!" to the url to get a new browser window or use the same:
http://www.amrein.com/new,Amrein Engineering
http://www.amrein.com/!,Amrein Engineering |
|
Pierre
5/31/2012 13:59 | Hi,
I don't want my users to see the "(Details..)" link to the list items in the Info Bubble. How can I prevent this link from showing up?
Thanks,
Pierre |
|
Juerg
5/31/2012 14:18 | Pierre,
to suppress the �(Details..)� link, please set the web part�s �Info Box Window Height� setting to -1 |
|
Jesper
6/15/2012 09:05 | Hi
Nice looking webpart. Is there a way I can connect it to a My Site list in SP 2010, and then you can "click" on people int here "My Site", or we are also using "Staff Directory Web Part", is there a change to "do something", so you can clkick and then se where the user is locatet, based on there addresse in My Site ?
Regards
Jesper |
|
Adam
7/19/2012 21:33 | You know you are advocating users unlawfully use the Google Map API right? That API is only freely available for public free websites. Internal sites can not (legally) use Google's Map API: https://developers.google.com/maps/licensing |
|
Thomas
7/20/2012 11:02 | John,
you can for example store your map icons in a folder beneath the Sharepoint _Layouts folder at: c:\Program Files\Common Files\Microsoft Shared\Web Server Extensions\14\TEMPLATE\LAYOUTS\GooglePins and then specify:
/_layouts/GooglePins
in the web part's "Map Icon Directory" setting. |
|
Juerg
7/20/2012 11:18 | Adam,
thanks for pointing this out. We have now placed a corresponding note at the top of the page. |
|
Les
7/27/2012 01:47 | Is there a way to display map by post code (Australia)? |
|
Thomas
7/27/2012 15:00 | Les,
there is a website offering for free a csv list which contains all Australian postal codes and their corresponding latitude/longitude:
http://blog.datalicious.com/free-download-all-australian-postcodes-geocod
You can import it into a new Sharepoint list and use it as a lookup list for your original Sharepoint list. |
|
Les
8/2/2012 06:55 | Hi Thomas, I would actually like to plot the whole post code region i.e so that the whole post code area is highlighted, rather than the specific lat/long of the post office.
Also, sometimes I have the same lat/long for different types of data e.g. if I am plotting apples and banana shop locations both have the same lat/long at present only 1 icon displays (which makes sense), however can I state a hierachy so that if both have the same lat/long the banana icon is used? |
|
Thomas
8/2/2012 11:38 | Les,
this tool exists: http://www.aus-emaps.com/postcode_finder.php. To make it with our Geo Mapper Web Part you need a kml-overlay-file which contains all post code border lines and the post codes.
To get two markers if the lat/long are identical you can use eventually calculated columns for lat/long which adds e.g. 0.00001 (about one meter) if it's an apple shop to get a difference to the bana shop. I'm not sure, but I think the last marker with the same position is at the top. No, you can't state a hierarchy. |
|
Tony
8/6/2012 17:54 | I am trying to place a Hyperlink within the Info Bubble. If I use <a href="{url field}">Link Text</a> then the link appears incorrectly (appended to current page url rather than just the {url field} link). I have tried using both a Hyperlink column and a Text column, both with same issue.
I dont want to display the entire URL as some are quite lengthy.
Any suggestions please? |
|
Thomas
8/8/2012 10:01 | Tony,
it works with Sharepoint list hyperlink columns (from Version 1.1.24):
Write in the template: {LinkColumnName} not: <A href="{LinkColumnName}">Displayname </A>. If you use a text column then the content of the column should be e.g.:
http://www.amrein.com,Amrein Engineering
you can add "/new" or "/!" to get a new browser window or use the same:
http://www.amrein.com/new,Amrein Engineering
http://www.amrein.com/!,Amrein Engineering
Url and display text are separated by comma. Without the display name (and without comma) the url itself will be used as display name.
When you would like to combine two text columns you must define an additional calculated column and use it in the template:
[Link] & "/new," & [City]
or
[Link] & "/!," & [City] |
|
Arnaud
8/23/2012 11:20 | Hello, thank you for this webpart which is very useful !
However, I have a question: Is it possible to display the Infobox on the right (or left) of the map instead of below ?
Thank you ! |
|
Juerg
8/23/2012 17:50 | Arnaud,
we have now added a new option to place the info box to the right of the map. You can enable this option by appending /right to the web part's "Info Box Column Name" setting.
Please download the new version from this web site, extract and then replace the DLL, followed by an �iisreset� command. |
|
David
8/26/2012 12:22 | Is there anyway to utilize MGRS grid coordinates as they were included in GE 6.0? I only work with grids and not L/L. |
|
Juerg
8/27/2012 14:35 | David,
the Geo Mapper web part currently only can work with Latitude/Longitude, so we would have to add the capability to have the web part transform the MGRS coordinates to Latitude/Longitude. |
|
Andy
8/30/2012 21:47 | I've noticed that many records are grouped together when in the same city but the streets of two records are a few miles apart. Is this because of the Google Map API, is this configurable? I would like every record to have its own icon |
|
Thomas
8/31/2012 16:36 | Andy,
each record has its own icon if Latitude/Longitude are different. Do the grouped icons separate from each other when you zoom in? |
|
Andy
8/31/2012 21:53 | Thank you for the response. I found that the grouped records had the same lat and long. We checked the address through the Google Maps API Example Geocode http://gmaps-samples.googlecode.com/svn/trunk/geocoder/singlegeocode.html and the same address returns the correct lat long. When we run the geocoder web part on our list, all records only return the lat long of the city for each address regardless of what is in the address. OurAddress field is as follows: {ADDRESS},{CITY},{STATE},{ZIP CODE}. I did verify that the street address field is spelled correctly and edited the field to verify that the internal name is no different (...746A7EF57FE%7D&Field;=ADDRESS) We only have 1100 items in our list as well. Thank you for your assistance |
|
Thomas
9/3/2012 11:39 | Andy,
please send us one complete address where the geocoder web part doesn't return the correct location to [email protected], thanks. |
|
Andy
9/10/2012 16:34 | Thanks for the help. We changed the address field from rich text to plain text and it worked. |
|
Panos
9/15/2012 19:52 | Hello, is there any way to automatically populate the longitude and latitude of new adresses or they have to be populated manually? in our site we have hundreds of new address input daily and it wont be possible |
|
Juerg
9/16/2012 14:26 | Panos,
we actually have the free �Geocoder� companion web part (please see download link at the top of this page) which allows to automatically translate the address field(s) contained in your Sharepoint List to Latitude and Longitude and store the results back into your List. The web part only looks up the lat/lon for List entries that are missing this information. |
|
R Myers
10/11/2012 16:20 | Is there a way to change the txt size in the bubble?
I have tried using the HTML <font> tag :
<font size="4" color=red>{FieldName}</font>
The color works but not the size. |
|
Juerg
10/11/2012 17:18 | R Myers,
this should work fine (we just tested). Can you re-try without the double quotes:
<font size=4 color=red>{FirstName}</font> |
|
R Myers
10/11/2012 17:32 | Juerg,
No, I have removed the quotes but no change in size. I am using IE10, perhaps it renders this differently, although it's a pretty common HTML tag! He's my entire Info Bubble Template Line
{Image},<br><br><strong><font size=8 color=red>{Store Name}</font></strong>,<br><br>{Address1},<br>{Address2},<br>{Postcode},<br><br>Tel: {Telephone Number},<br><br>Email: {Email Address},<br><br><Strong>Store Manager: {Store Manager Name}</Strong> |
|
Juerg
10/11/2012 17:41 | R Myers,
can you use the following CSS styling instead of the deprecated "font" HTML tag:
<span style="font-size:16pt"><span style="color:red">{Store Name}</span></span> |
|
R Myers
10/11/2012 17:47 | Juerg,
Still no joy I'm afraid. It's not a show stopper. |
|
Mike Z
11/28/2012 22:46 | I'm testing this webpart out and it's pretty cool so far.
I'm wondering if there's a way to get rid of the scroll bars on the map though? For some reason the map is smaller than the object I see white space on the right side between the edge of the map and scroll bar. Is there a way to get rid of the scroll bars all together and just rely on draging the map around?
Thanks! |
|
Mike Z
11/28/2012 22:52 | Sorry, got rid of the Scroll bars by removing the Height & Width properites in the Advanced section of the webpart.
However, I still have a large light yellow bar at the bottom of the map that I'd like to remove.
Thanks again |
|
Thomas
11/29/2012 10:36 | Mike,
you can remove the large light yellow bar at the bottom of the map by setting "Info Box Window Height" to 0 in the Web Part Editor "Miscellaneous" pane section. |
|
Mike Z
11/29/2012 22:37 | Just trying to polish up my map with ICONs and can't get it to work. The map just goes "blank" with no items visible.
What I want to do:
Have two choice columns: Category & Group.
Have a Calcualted Column = Category+Group
Have an asset library on my collection for the pin images.
Name the Pin Image files to be the combinations of my Calculated Column.
Then I'd like to assign that calulated column to be my Map Icon Directory.
Here's my URL of the Library of Map Icons:
http://aamteams.alv.autoliv.int/sites/alvCustBUTemplate/MapPins/Forms/Thumbnails.aspx
So I put "MapPins" into the "Map Icon Directory" and
put "GroupCategory" without Quotes in the Icon Column Name.
Is this possible? Or do I have to point back to some master directory for the Web App?
Thanks! |
|
Thomas
11/30/2012 10:31 | Mike,
it should work this way:
Icon Column Name: GroupCategory
Map Icon Directory: http://aamteams.alv.autoliv.int/sites/alvCustBUTemplate/MapPins
Map Icon: leave empty
Calcualted Column GroupCategory in the Sharepoint List:
Enter the icon file names without the .png file extension, eg. if your custom icon is "myIcon.png", just enter "myIcon" into your List's icon column. |
|
Mike Z
11/30/2012 23:50 | Thanks Thomas, this worked perfectly!
Just curious if there's a way to reference the Map Icon Directory without the full path and just use a local reference within the site collection? I'm going to try and use this site as a template and so it will be reused many times and I'm afraid I might have to update the link every time I make a new copy.
If not, it's not the end of the world... wouldn't have Any map if it werent for your products.
Thanks! |
|
Thomas
12/3/2012 10:28 | Mike,
it works also with relative paths, e.g.:
Site: alvCustBUTemplate
Pictures Library in alvCustBUTemplate: http://aamteams.alv.autoliv.int/sites/alvCustBUTemplate/MapPins/Forms/AllItems.aspx
Page: http://aamteams.alv.autoliv.int/sites/alvCustBUTemplate/SitePages/GeoMapperPage.aspx
Web Part Configuration:
Icon Column Name: GroupCategory
Map Icon Directory: ../MapPins
Map Icon: leave empty. |
|
Mike Z
12/4/2012 18:02 | Request for Update:
I've tried combining a few different lists to build a map which works fine.
The issue now is that I'd like to have the list combo box but with an option to show all lists on the map at once (like an overlay).
Can you build this option into the list so the list dropdown has a "blank" or "all"? I don't see a need for multi select... Just All or a specific list.
Thanks for great easy to use web part again |
|
Mike Z
12/4/2012 18:14 | I just saw the previous person's question about multiple lists and the answer that they can't be consolidated so that answers that question.
If that's the case, I have two recommendations:
1. Move the check box to "Show List Combo" right up by where you enter multiple list names.
2. Get rid of the check box all together because it's not optional if you have more than one list.
Guess it's not critical once you make the mistake, but it might avoid new users from getting confused on it.
Thanks again |
|
Mike Z
12/4/2012 18:25 | The only solution I can think of with regards to overlaying mutliple map lists would be to create a workflow on your map lists to copy or update items in a seperate list that functions as a combined list.
Just not sure if it's possible with functions allowed in SPD to copy/update something from list "A" into list "B".
|
|
Thomas
12/5/2012 15:23 | Mike,
the previous answer about multiple lists was misleading: If you enter several list names from the actual site into the configuration field "List Name", separated by ";" and uncheck "Show List Combo" then the Geo Mapper web part rolls up these lists. |
|
Mike Z
12/6/2012 19:04 | Hi Thomas,
I tried that and it doesn't seem to work so maybe I have some syntax issue. I attached most of my "Advanced Settings" at the end.
Some notes on my lists:
All 3 lists have all the same columns except the first one has two additional columns. But all 3 have the exact same fields I'm using for the Search Filters.
With these settings, and List Combo Box checked:
I get my 3 lists in the combo box.
When I select each individual list, I get those items on the map.
HOWEVER, in the Search Filters, I only see the values from the first list.
So it's giving me the right locations, but not the right Search Filter Options.
With these settings, and List Combo Box NOT checked:
I only see the items in the First List.
The Drop Down options for my filter fields only show drop downs from the first list so it's not grabbing Filters for all lists.
Because of the Search Filter missing data, I also tried an option with No Combo Box and No Search Filters to see if that was messing it up. That also didn't resolve the issue.
Could it be that the list names have spaces or something? I tried double quotes and it didn't like that.
Or is it possible we don't have the latest version? We just got ours within the last couple weeks.
Thanks for the support!
Site Name:
EMPTY
List Name:
ALV Plants;Other Map Locations;OEM Locations
EMPTYName:
Empty
Map Icon Dir:
http://aamteams.alv.autoliv.int/sites/alvCustBUTemplate/MapPins
Icon Column Name: (Calculated column of Group + Category)
GroupCategory
Info Bubble Template
<font color=green>{Site Name}</font>, ({Company}),<br>Group: {Group},<br>Category: {Category},<br><br>{City}, {Region},<br>{URL}
Info Bubble Autol Close
NOT Chcked
ToolTip Template
{Site Name}; ({Company})\n;{City}; {Region}
Show List Combo
NOT Checked
Search Filter(s)
@Group;@Company;@Category |
|
Mike Z
12/6/2012 19:20 | I did one last test by only combining two lists with identical columns.
This didn't change anything.
No matter what options or lists I select, I only see filters for the first list.
When dont' use combo box, only see the locations from the first list.
When I use a combo box, I see the data, but the filter drop-downs only seem to pull from the first list.
THanks again |
|
Mike Z
12/7/2012 01:59 | In addition to my previous question... I was wondering the following:
I have a library of 10 map pins and would like to have a map legend for the pin icons.
So I tried doing a library web part below the map but it just didn't look very good. The problems were that the Transparent portion of the pin was Black, and the Thumbnails were huge.
Is there a good way to do a legend? If not, would you be able to build a simple companion web part that's taylored to work like a legend? For example, the transparent part of the Pin is Transparent, and the Thumbnail or preview is very small like the true size of your pin graphics?
Alternativly, could we somehow use your Picture Menu part to get the same effect if we put it to the right or left of the map? I've been able to do a lot with your web parts but unfortunately I know nothing of HTML programming so it would be hard to do any customization in SPD or with "Styles".
Thanks again |
|
Thomas
12/7/2012 15:35 | Mike,
we will fix the multi list behavior until end of year because it's more work than expected. You can enter the legend text and the pin links into a Content Editor Web Part and place it near the Geo Mapper Web Part or if it's a SP2010 wiki page then you can switch to the page edit mode and enter the legend directly into the page. |
|
Mike Z
12/7/2012 17:25 | Thanks for the fix Thomas. Is there a way to be notified when the part has the update? I don't see any rev # or reference in the Product area... or should I just keep watching here?
Also on the legend... I could do something like that (or a screen shot). But I'm hoping for something more "automatic" in case there are any updates.
From what I saw of your Picture Menu Web Part, I think that might work couldn't it? We don't have it installed yet but it seems like you point it to a library for the Icon list and a column for the Names/Labels. We can tweak the Icon size, row/column format etc... so it could be put on the bottom or side of the map. Not sure about the Transparent color being black but if that's the only downside, we could just set the color of the menu to black to mask it.
Thanks again. |
|
Thomas
12/7/2012 18:48 | Mike,
send a mail to [email protected] and we will notify you. Yes, the Picture Menu Web Part should work as a legend. But you have to add the List item attachments manually. |
|
New User
12/12/2012 19:43 | I was looking at the Google Maps API for Business and was wondering which "Features" of the liscense this part requires? I know our list would already have Lat/Long and addresses so we wouldn't use the Geocoding Web Service. I'm thinking just Static Maps API.
Just trying to help build a business case for our company to deploy this.
Thanks for any insight. |
|
Thomas
12/13/2012 10:44 | New User,
our Google Geo Mapper Sharepoint Web Part doesn't need any of the
Google Maps API for Business enhanced features. But of course the standard Google Maps API limits are applied without a Google Maps Business License. |
|
Mike Z
12/20/2012 18:00 | Is it possible to have an option to limit the "Map Refresh" based on clicking an "Update" button?
Right now we are testing a possible usage showing our global supplier list which is several thousand items long.
To help us narrow down the map, we are using at least 5 dropdowns or text filter boxes on the part. As you can guess, each time we apply a filter, it has to rebuild the map.
So it would be helpful to have an optional setting that only updates the map when you press a button. Outside of all the positive feedback I had received, this was one of the first comments people always mention when trying it (on a list with lot of drop-downs).
By the way, the feedback has been great on this part.
Thanks for your help again |
|
Thomas
12/21/2012 15:20 | Mike Z,
we consider to add this feature early next year. |
|
Val
12/28/2012 15:30 | We just recently downloaded and installed the GeoMapper webpart into our SharePoint installation. I added the GeoMapper webpart onto a Publishing Page Layout. The intent is to allow content developers to create map pages as needed for the website without having to add the map to the page manually.
The page layout configuration for the webpart points to a custom list, again, trying to make it easy for content developers to add new map pages to the website.
I have used the page layout to create a publishing page and have configured the web part on the publishing page to point to a specific View in the list.
The webpart displays on the page (along with the map) until I enter Latitude and Longitude values into the list. When these values are added, the entire webpart disappears from the page.
Any suggestions for what the issue might be? I do not receive any error messages. |
|
Mike Z
1/11/2013 21:28 | Just a suggestion to anyone using this part and using custom pins.... This feature works very nicely, but google maps doesn't come with a pin legend. However, we've been able to use Amrein's Picutre Menu part to create a very professional looking legend to the left of the map.
Who knows, you might even be able to use a connection feature to click on a legend item and have it filter the map for only those items.
Thanks again for a very useful part. |
|
James Grizzle
3/1/2013 17:17 | Thank you for this fantastic Web Part and your great support! I have a question regarding the Geocoder Web Part. I am building my lat/long values from a lookup column that allows multiple values like so:
{Address},{City_lookup},{Address:State},{Address:postalCode}
If I select more than one address in my multi-select lookup column, the Geocoder is unable to detect that more than one entry has been entered.
Do you plan on enabling the use of multi-select lookups in the future?
I am using version: 1.0.2 of the Geocoder Web Part and version: 1.2.9 of the Geo Mapper Web Part.
Thank you! |
|
Ron
3/26/2013 20:55 | I'm configuring our web part to use a shared Google API Premier key. To separate Google usage in the logs, we must use a 'Channel' key in the API call. Where can I configure this for use by this web part? |
|
Juerg
3/27/2013 10:25 | Ron,
you can append the channel key to the web part�s �Map Language� setting as follows (assuming your desired map language is English):
en&channel;=yourChannelParameter
(replace �yourChannelParameter� with your channel ID). |
|
James Grizzle
4/17/2013 15:33 | The following error crops up in the Geocoder Web part:
Google Gecoding Error: The given API key i s either invalid or does not match the domain for which it was given.
I am using the following versions:
AE Geomapper: 1.2.9
AE Geocoder: 1.0.2
|
|
Juerg
4/17/2013 15:51 | James,
please update the Geocoder web part to the current version 1.1.0. This version does not require a Google Maps API key anymore. |
|
Lipsa
6/24/2013 08:52 | Hi,
I have installed AEGeomapper Version 1.2.16.Problem I am facing here is google map is not rendering.It was working with previous version.The only difference i am getting "Google API Key" field is not available in newer version.Any suggation why the map is not loading? |
|
Joe
6/24/2013 18:40 | Great webpart. I am using this webpart with an external list. When I do not mention a view it works as expected. However when I name a particular view to use it states "List not found". Is this just a limitation with external lists. |
|
Juerg
6/24/2013 18:59 | Joe,
to make the Geo Mapper web part work with an external List view, please append the unique List ID name to the web part�s �List Name� setting:
Example:
Customers/id=CustomerID |
|
Juerg
6/28/2013 15:17 | Lipsa,
the newer versions of the Geo Mapper web part are using the new Google Maps API which does not require the API key anymore. Can you send us your web part settings ("Miscellaneous" section") to [email protected] ? |
|
Lipsa
7/5/2013 08:46 | Juerg,
I have mailed you the required section for Geo mapper Configuration.Any help on this will be appreciated.
Thanks,
Lipsa |
|
James Grizzle
11/7/2013 19:48 | After months of successful use, the Geocoder Web Part has quit working for us. The error that we get states that the Web Part is unable to find the list. We get this on all instances (including new instances pointing to different lists) of the Web Part. Any ideas? We are using version 1.1.2 of the Geocoder Web Part. |
|
Niki
11/11/2013 22:41 | I have links in my info bubbles, is there a way to have the bubbles automatically display so the user doesn't have to hover over the icon or click on it? |
|
Juerg
11/12/2013 11:49 | Niki,
this is currently not possible. Please note that if a lot of markers are displayed, then each marker also would display its info bubble, so the map then might be covered with a lot of open info bubbles which would cover the underlying map. |
|
Juerg
11/12/2013 12:03 | James,
we have now added some extended error logging to the Geocoder web part to pinpoint the cause of the �List not found� error.
Please re-download the updated Zip file, extract the WSP file and then update the web part solution. |
|
Juerg
11/13/2013 13:12 | James,
can you check with your Network admin if the proxy settings do not let the Sharepoint web front end server access the below URL:
https://maps.googleapis.com |
|
Dan Hebert
11/13/2013 17:13 | Juerg, I'm having a difficult time getting .kml files to overlay. I've been able to successfully load the google developers sample .kml file, but when I try to load a custom .kml made from exporting a shapefile (.shp) to .kml it doesn't load.
Are there any limitations to be aware of regarding .kml files? If not, how would I troubleshoot this issue?
This web part is awesome, by the way! |
|
Juerg
11/13/2013 17:24 | Dan,
please note that since the KML file is accessed by Google to create the map, the file will need to have public access (thus you either need to place it on a Web Site with anonymous access or in a Sharepoint Document Library that is configured for anonymous access). |
|
Dan hebert
11/13/2013 17:32 | Juerg, Thanks for the quick reply!
I did try hosting the .kml file on a public web server (also tried a google drive link to publicly accessible file) but neither of those worked.
Are there any filesize limitations to the .kml files? I did notice the sample .kml file that DID load for me was under 1 MB, whereas the .kml file I'm trying to load is 15+ MB... but I don't even see any reference to it when I look in IE Dev Tools (or Chrome). |
|
Dan Hebert
11/13/2013 17:37 | Sure thing, kml files = http://www.aristotlesalexander.com/leaseblocks.kml or https://drive.google.com/file/d/0B3tV-Od-1GYdaVg5ZGVjRWo0VDA/edit?usp=sharing |
|
Juerg
11/13/2013 18:12 | Dan,
since your KML file size is about 26MB, the below limitation seems to apply:
Google Maps currently has specific limitations to the size and complexity of loaded KML files. Below is a summary of the current limits:
- Maximum fetched file size (raw KML, raw GeoRSS, or compressed KMZ) 3MB
- Maximum uncompressed KML file size 10MB
- Maximum number of Network Links 10
- Maximum number of total document-wide features 1,000
There is a limit on the number of KML Layers that can be displayed on a single Google Map. If you exceed this limit, none of your layers will display. The limit is based on the total length of all URLs passed to the KML Layer class, and consequently will vary by application; on average, you should be able to load between 10 and 20 layers without hitting the limit.
We noticed that there is a huge amount of <[CDATA blocks contained in the KML file which could be purged (since this data is not used by Google Maps). |
|
Dan Hebert
11/13/2013 19:06 | Mr. Amrein, I will retry with the specifications you posted and let you know how it goes. Thank you for that.
One other question: with this web part, is it possible to interactively select a KML file contained in a Sharepoint Document Library by using a web part connection to select the KML file (which seems to be possible with your Google Earth SharePoint Web Part)?
|
|
Juerg
11/13/2013 19:33 | Dan,
you actually can connect a Sharepoint List to the Geo Mapper web part.
Add a List column named �KML� (of type �single line of text� or �Picture or hyperlink�)
If the above field is non-empty, the corresponding URL pointing to the KML file will be used by the web part when a List column is selected by the user.
Make sure that the URL can be reached anonymously (since the Google Map server will need to be able to access it). |
|
Dan Hebert
11/14/2013 16:14 | Juerg I am able to load kml files just fine now, using the specs you provided. Thanks!
I would really like to offer the option to pick a KML via dropdown, but I can't seem to get it working.
Here's what I'm doing:
1] Created a new list titled 'kml'
2] added a column titled 'kml' to that list (type: picture or hyperlink)rer2
3] added a publicly accessible url to each item in the 'kml' column
4] added 'kml' list web part to the same page as my Geo Mapper web part
5] connected the 'kml' web part to my Geo Mapper web part
6] but as soon as i do step 5, i get this error where the map should render (note: PlatInfo is the name of the list used for plotting on Geo Map)
> PlatInfo: Sharepoint List not found!
- Should I be adding my new hyperlink column to the same list that's used for my plotted points?
- or do I have to connect a certain way (receive filter from web part vs send filter to web part)?
- or is it the url of my KML list that needs to be publicly accessible, not just the hyperlink to .kml files (and actually, i'm trying this with .kmz files, would that matter?)
Not sure what else it could be...? |
|
Juerg
11/14/2013 19:54 | Dan,
we have now added the option to connect a Filter web part to the Geo Mapper web part.
You can for example use our free �Filter� web part (see /apps/page.asp?Q=5835) , configure it as a dropdown filter and enter the following �Default Value�:
http://somedomain/somesite/Lists/somelist|KML|Title
assuming that your list contains a column named �KML� that holds the URL�s pointing to the KML files.
You then do not need to enter a list name into the Geo Mapper web part�s �List Name� setting since the web part will now display the selected KML file.
Please re-download the updated Zip file, extract the WSP file and then update the web part solution. |
|
Alexis
11/15/2013 22:41 | I have a map with several views and searching items (text and drop down). Is there a way to have the map zoom when a particular view or search is entered? Initial map zoom is set to 2 - but if a particular country was selected I would like to zoom to a more local level
Thank you! |
|
Juerg
11/18/2013 17:15 | Alexis,
you can enter a negative value into the web part's "Initial Zoom Level" setting to let it automatically adjust the zoom level to include all the displayed pins on the map. |
|
Alexis
11/18/2013 22:17 | Thank you Juerg,
The initial zoom of 2 was working to include all locations, but to be more specific: I have a world map - with pins identifying approx 500 different locations...if I use a drop down to choose a particular view, for example locations only in Italy, I was looking for the map to zoom in ( to a 6 or 7 zoom) on just that one specified area based on the view that is chosen, and not remain at the initial zoom level (I hope i have clarified)
|
|
Juerg
11/19/2013 13:27 | Alex,
just enter a negative "Initial Zoom Level" setting (as for example "-1") to let the web part automatically calculated the proper zoom level for each view (so that all the locations for each view fit onto0 the map). |
|
Alexis
12/30/2013 20:34 | Hi Juerg,
I have a column in my list for hyperlink (Hyperlink or Picture) that is only populated for a select group of entries, and others are intentionally left blank.
In the info bubble template I have the code: <font size=2 color=green>{City},{State_Prov}<br>,{Country}</font><br>,{Hyperlink}.
The entries that have the hyperlink populated in the list are displaying correctly. However, for those entries without a hyperlink, there is a comma displayed in the info bubble rather than a blank space.
And even more strangely, the commas are only displaying in info-bubbles of locations outside the United States.
Any reason why this might be happening to the select group? I have rechecked my list to ensure the fields that are supposed to blank have no other coding or text entered into it.
|
|
Juerg
1/3/2014 13:49 | Alexis,
can you quickly check the web part�s version number by opening the web part�s tool pane and looking it up at the top ? |
|
CVW
2/18/2014 16:02 | Hi,
Our business is in many locations. I would like to have a web part which cycles through locations in a sharepoint list, and displays the google map for each one.... e.g. Either like your "Spotlight On" or "Picture Slide Show" - is this the Web Part for me ? Or am I asking too much ? |
|
Juerg
2/18/2014 18:48 | CVW,
you can actually use the Geo Mapper web part to display a random entry on each page visit by entering the below option into the web part�s �Options� setting:
random=1 |
|
SharePoint developer
2/28/2014 07:53 | How to customize the Info bubble with HTML content( formatted way like table) and also change info bubble color based on condition. |
|
Jen L
4/11/2014 16:01 | Hi Juerg, we're putting pins in to denote events based only on city/state (not street addresses), and using a Y/N checkbox column to determine the icon (Icon is a calculated column based on the y/n). If we have multiple events in the same city, they're all showing up on the same pin, desptie some of them being checked with Y and some N. We'd like the Y ones to appear together, and the N ones to appear together in a separate pin -- is this possible? Thanks! |
|
Juerg
4/14/2014 18:13 | Jen,
we are forced to merge pins assigned to the exact same location into a single pin since otherwise these pins are displayed on top of each other and then only the topmost pin can be clicked (eg. the pins sitting behind the top pin cannot be clicked).
A workaround would be to add a slightly different location to each one of these pins in order to show them as separate items. |
|
Dana
5/22/2014 18:17 | I am trying to get the color coded map icon pins to work. I have tried all of the different options in the documentation as well as listed here but they do not show up. I copied the pin files to my /_layouts/GooglePins and then enter only the icon name e.g. blue in the icon column in my list but it will not populate to the map. Is there a certain column type that the icon name column has to be? I have a single line of text currently. I also tried to set this up using the http link to amrein pin page but that doesnt seem to work either. Any suggestions or help would be appreciated. |
|
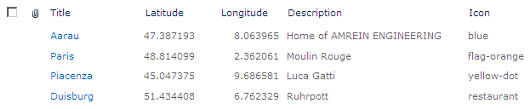
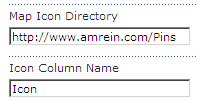
Juerg
5/22/2014 20:09 | Dana,
here�s an example on how to configure the custom icons:
- Add a column (in the below example named �Icon�) to your list and then enter the pin names (the example uses pins from the collection at www.amrein.com/Pins ):
- Configure the two fields below:
- The map should now use your custom icons:
|
|
Juli
9/19/2014 17:24 | I have addresses in the UK and Russia that I have provided the correct latitude and longitude to, but they do not show up. Are there areas that are not supported? |
|
Juerg
9/19/2014 18:23 | Juli,
can you provide an example of a UK address and a Russia address ? |
|
Juli
9/19/2014 19:37 | Note: Both of these were found successfully on Google Map's lat/Long lookup page.
Cork:
Building 4300, Cork Airport Business Park, Kinsale Road, Cork Co, Ireland
Russia;
Testovskaya 10, 123317 Moscow, Russia |
|
Juerg
9/20/2014 15:25 | Juli,
we tested both addresses:
Cork Airport Business Park, Kinsale Road, Cork Co, Ireland:
Lat=51.8258611
Lon=-8.4732553
Testovskaya 10, 123317, Moscow, Russia
Lat=55.7520458
Lon=37.5328605
and they both show up in the GeoMapper web part as expected.
Can you check if you are using the same coordinates ? |
|
Juli
9/24/2014 20:11 | I corrected the entries to match yours and they still don't show up. |
|
Juli
9/24/2014 21:14 | It's working now |
|
Juli
9/24/2014 21:30 | The Info Box is causing some issues. It displays either on the bottom or the right, but it does NOT display the contents of the column. I have tried with 2 different columns. No data is being displayed |
|
Juerg
9/25/2014 15:25 | Juli,
we recently added templating to the "Info Box" where you can enter multiple columns (enclosed in curly braces), mixed with HTML tags.
Examples:
{City}
{Title}<br/>{City}, {Zip}
You thus will need to enclose the column name in curly braces when entering it into the "Info Box Column Name" web part setting . |
|
Jon
10/10/2014 06:50 | Geo Mapper Sharepoint Web Part
I'm having some trouble with the "Info Bubble Auto Close" in conjunction with the "Show Details View Link" option.
If I set "Info Bubble Auto Close" to Yes, the Info Bubble correctly appears when the user clicks on any of the map pins (there are currently 5, all from a sharepoint list with lat/long fields). The problem is the Info Bubble disappears when they move the mouse over it! This means they are unable to click on the (Details...) link (which is the feature we really need to work)
However,
If I set "Info Bubble Auto Close" to Yes, the Info Bubble appears correctly when the user FIRST clicks on the any map pin, BUT now the Info Bubble no longer works when clicking on any other pin (except the first pin that was clicked on). The only way to reset it seems to be to reload the page.
I am observing the same problem in Internet Explorer and Chrome. The site is Sharepoint 2013. The Amrein webpart is licenced.
Any help to resolve this is greatly appreciated!
Jon |
|
Jon
10/10/2014 06:52 | ** above post should read:
However,
If I set "Info Bubble Auto Close" to NO, .. |
|
Jen
5/1/2015 23:34 | Hi there,
It looks like our info bubble has stopped working - clicking on a pin brings up a blank bubble, whereas it used to display data as expected. The values in the Info Bubble Template field are: {Title}, {Date}. Any suggestions on what might be happening? Do we need to change something?
Thanks! |
|
Juerg
5/4/2015 18:39 | Jen,
please make sure to enter an non-zero value into the web part's "Info Bubble Width" setting. |
|
Hayley
5/6/2015 16:49 | Hi,
I am unable to display all locations in my list at once, I am required to click 'Select' within my list in order to display the location on the map web part.
Also, I cannot seem to get the pins to work. The links to pin libraries in the instructions are broken.
However I would just like to use a simple default icon.
Many thanks in advance.
Hayley |
|
Juerg
5/6/2015 17:09 | Hayley,
did you connect the Gero Mapper web part to a Sharepoint list via a web part connection ?
If yes, then please note that this setup is useful only if you want your users to be able to interactively select a specific location from the list.
By default, you would simply point the web part to a Sharpeoint list via the "List Name" setting to display all locations contained in the list.
The Google pin location URL is not broken, but Google does not allow you anymore to browse the directory.
You can still get a preview of the available icons via /forms/GooglePins.asp |
|
Chris
5/6/2015 17:18 | Hi, I am receiving error: Sharepoint List not found! when adding my list URL. What is the correct list URL format to use?? |
|
Hayley
5/6/2015 17:40 | Thanks so much for the quick response, as always!
I have removed the connection, but now it is not displaying any items, perhaps i'm having the same issue as Chris where im not using the right format to enter the list view name?
Thanks |
|
Chris
5/6/2015 17:47 | I�ve worked that out now.
Do you have configuration instructions for 2013 as the config details for the web part connections seem different than to how they�ve been detailed for 2010.
|
|
Juerg
5/6/2015 18:34 | Hayley,
please just enter the name of the List (as opposed to the List URL) into the web part's "List Name" setting.
If your list is located in another site (compared to the site hosting the web part), please refer to the "Site Name" setting as described at the top of this page. |
|
Juerg
5/6/2015 18:38 | Chris,
I assume that you placed both the Geo Mapper and a Sharepoint List web part on the same page.
In this case please choose �Get RowProvider From�.
This then allows you to interactively select a row in the List web part to display the selected location on the map. |
|
Hayley
5/7/2015 17:51 | Hey Juerg,
So its our version of IE that is causing the problem as I tried it in chrome and it works....boo :( |
|
Chris Cundy
5/13/2015 11:25 | Has anyone encountered this error on the AE Geocoder Web Part?
Error Accessing the Google Geocoding service: The remote server returned an error: (407) Proxy Authentication Required. |
|
Juerg
5/13/2015 11:45 | Chris,
it looks like the Sharepoint web front end server is not allowed to reach:
http://maps.googleapis.com
Can you check if your proxy blocks access to this site ?
It usually helps if you change the �trust level� line in your web.config file from
<trust level="WSS_Medium" originUrl="" />
to
<trust level="WSS_Medium" originUrl=".*" />
eg. insert the ".*" characters into the originUrl attribute (please note that your trust level must not be "WSS_Medium" as in the example above, but also might be �WSS_Minimal� or �Full�).
This should enable Web Service calls to any destination.
If this does not help and you are using a proxy server, then you can also change the �defaultProxy� setting in your web.config as follows, where �xxx� is your proxy server IP (ISA) and �yyyy� is the port of the proxy:
By default it looks like:
<system.net>
<defaultProxy>
<proxy autoDetect="true" />
</defaultProxy>
</system.net>
You might have to add your specific proxy information as follows:
<system.net>
<defaultProxy useDefaultCredentials="true">
<proxy usesystemdefault="false" proxyaddress="http://xxx:yyyy" bypassonlocal="true" />
</defaultProxy>
</system.net>
|
|
Craig
5/21/2015 21:04 | Installed v1.3.5 using PowerShell Update-SPSolution. I was surprised that it even updated the web part instance on the page, without having to add and configure a new instance! It's connected to a List, and to Geo Coder, but above the map it displays this error, one for each list item:
"Error processing 'FileRef' field:Value does not fall within the expected range"
Then, it proceeds to work, displaying all the pins, each with an InfoBubble.
Is it a bug, or am I missing something? Thanks. |
|
Juerg
5/21/2015 21:23 | Craig,
V1.3.5 is actually the current Office365 "sandbox" version but it seems that you rather would need to use the most current on-premise version (V1.2.51)
Can you download the correct version and then update the solution ? |
|
Daniel
9/15/2015 08:17 | Hello
I've setup my map and it's basically working great. The only thing is, when I go to/refresh the page or filter the map, there's always an empty info bubble displayed. But my list view doesn't show an empty record or a record with missing field values.
Thanks for any advice
Daniel |
|
Parry
11/13/2015 01:08 | Hi Juerg, thank you for building this component, it is extremely easy to use and very helpful. I'm currently using the free version of the webpart (ver 1.2.55) and for some reason I have to limit the number of records to 1999 only. I'm using a stored procedure to fetch the records through an External Content Type (SQL Server). |
|
Juerg
11/15/2015 14:10 | Parry,
do you mean that the web part is not able to display 2,000 pins or more ?
If yes, do you get an error message if the list contains more than 2,000 items ? |
|
Nick
12/9/2015 20:58 | Hi all - I have a problem highlighted by Jon in an earlier post. I didn't see a solution to the problem. Here is the original post, I am having the same problem....Help!
*******************************************
I'm having some trouble with the "Info Bubble Auto Close" in conjunction with the "Show Details View Link" option.
If I set "Info Bubble Auto Close" to Yes, the Info Bubble correctly appears when the user clicks on any of the map pins (there are currently 5, all from a sharepoint list with lat/long fields). The problem is the Info Bubble disappears when they move the mouse over it! This means they are unable to click on the (Details...) link (which is the feature we really need to work)
However,
If I set "Info Bubble Auto Close" to Yes, the Info Bubble appears correctly when the user FIRST clicks on the any map pin, BUT now the Info Bubble no longer works when clicking on any other pin (except the first pin that was clicked on). The only way to reset it seems to be to reload the page.
I am observing the same problem in Internet Explorer and Chrome. The site is Sharepoint 2013. The Amrein webpart is licenced.
Any help to resolve this is greatly appreciated!
******************************************* |
|
Steve
7/13/2016 23:16 | Juerg, seems to be my week for asking for help. When the page loads the map appears and then is replaced by "Oops! Something went wrong. This page didn't load Google Maps correctly. See the javaScript console for details".
They are using the sand box Version 1.3.8 for Office 365. I have uploaded the GEO Mapper solution and added the web part to the page. I am not using the GeoCoder, the Latitude and longitude are in the SharePoint list. I am using a number field for them both with decimal set to auto. They are both in the view that the web part is pulling from. Any suggestions? Thank you. |
|
Steve
7/13/2016 23:55 | I think I forgot to add my email to the comment above. Thanks. |
|
Juerg
7/14/2016 12:07 | Steve,
which browse rare you using ?
We checked with Chrome and IE11 (on Windows 8) on Office365 (version 1.3.8) and we do not observe this issue.
Are you on Office365 or on-premise (but using the sandboxed version) ? |
|
Jeremy
7/14/2016 20:18 | I'm experiencing the same 'Oops' error that Steve is seeing. I'm using SP2013 on-premises. I've been playing around with various views and settings without any luck. Using number fields for Lat and Long |
|
Juerg
7/15/2016 18:48 | Jeremy,
it looks like Google recently started to check Google Map requests for the presence of an API key (although so far only one other first customer reported this issue).
We thus added the new �key� option (to be added to the web part�s �Options� setting) to allow you to pass a Google API key as illustrated below:
key=AIzaSyDrN1j6oizXP6fBAiXMA2V1HePUnf4dc2Y
Please re-download the updated Zip file, extract the WSP file and then update the web part solution.
You then first might try the above key and if it works then proceed to get your own Google API key which you can get here:
https://developers.google.com/maps/documentation/javascript/get-api-key
|
|
Will
7/19/2016 22:51 | I'm using SP2013 on-premises and trying to use the @ with filters, but the combo's come up empty and no filter can be selected. |
|
Juerg
7/20/2016 12:10 | Will,
does the web part otherwise work OK or do you get an error message ?
Also, are you using a list view ("View Name" web part setting) and made sure to include the columns to be searched for int he list's view ? |
|
Will
7/20/2016 16:18 | Hello Juerg,
The web part does not give an error and I am not using a list view.
It works fine while I'm editing the app the combo box is populated by the available list values.
Its when I am not editing that the combo boxes become unfilled. |
|
Juerg
7/20/2016 18:16 | Will,
is the combo search box still empty when navigating away and then re-entering the page ? |
|
Will
7/20/2016 20:26 | Yes, it is still empty. |
|
Juerg
7/23/2016 16:05 | Will,
would it be possible to schedule a screen sharing session to investigate the issue ? Please contact our support at [email protected] . |
|
Jack
8/29/2016 02:53 | List has over 300 items, Info Bubble displays no content. When entering any list column name such {Title}. Once a value is enter in Info Bubble Template then the webpart and list stop displaying. Any suggestions. |
|
Juerg
8/29/2016 19:37 | Jack,
can you indicate what exactly you entered into the web part's "Info Bubble Template" setting ? |
|
Paul
9/21/2016 18:07 | I have added the Geo Mapper and the Geocoder apps to our on-premis SharePoint 2013. The Geocoder has translated the list of addresses and updated the list with longitude and latitued coordinates. I pointed the Geo Mapper to the same list but it gives an error of, "Oops! Something went wrong.
This page didn't load Google Maps correctly. See the JavaScript console for technical details."
Any suggestions of what I need to do to fix this issue? |
|
Juerg
9/23/2016 18:48 | Paul,
it looks like Google Maps now is expecting an API key.
Please added the �key� option (to be added to the web part�s �Options� setting) to allow you to pass a Google API key as illustrated below:
key=AIzaSyDrN1j6oizXP6fBAiXMA2V1HePUnf4dc2Y
You then first might try the above key and if it works then proceed to get your own Google API key which you can get here:
https://developers.google.com/maps/documentation/javascript/get-api-key |
|
FireBird76
3/22/2017 15:27 | The map is only displaying one list item at a time, I have to manually select from the list which isn't ideal. Is there a way to display all list items on the map? A setting perhaps |
|
Juerg
3/22/2017 15:40 | FireBird76,
please note that you only need to manually select a location when using a web part connection to connect the GeoMapper web part to a Sharepoint List webpart.
To display all the locations contained in your list, remove the web part connection and enter the list name into the web part's "List Name" setting. |
|
FireBird76
3/23/2017 10:22 | Hi Juerg, I removed the connections like you suggested and added the List Name to the List Name column and I now have an error - Sharepoint List not found! Please can you advise |
|
Juerg
3/23/2017 17:10 | FireBird76,
is the list contained in the same site as the web part ?
Can you send us both the List URL and the URL of the page hosting the web part to [email protected] ? |
|
Sandip
7/17/2017 13:28 | Is there a way to customise the look of the base map from google, I have used the styling wizard to generate the type of map, pasted below for info: how can I use this within your web part?
JSON-----------------------------------------------------
[{
"stylers": [{"lightness": 45}]
},
{
"elementType": "geometry",
"stylers": [{"color": "#212121"}]
},
{
"elementType": "labels.icon",
"stylers": [{"visibility": "off"}]
},
{
"elementType": "labels.text.fill",
"stylers": [{"color": "#757575"}]
},
{
"elementType": "labels.text.stroke",
"stylers": [{"color": "#212121"}]
},
{
"featureType": "administrative",
"elementType": "geometry",
"stylers": [{"color": "#757575"}]
},
{
"featureType": "administrative.country",
"elementType": "labels.text.fill",
"stylers": [{"color": "#9e9e9e"}]
},
{
"featureType": "administrative.locality",
"elementType": "labels.text.fill",
"stylers": [{"color": "#bdbdbd"}]
},
{
"featureType": "poi",
"elementType": "labels.text.fill",
"stylers": [{"color": "#757575"}]
},
{
"featureType": "poi.park",
"elementType": "geometry",
"stylers": [{"color": "#181818"}]
},
{
"featureType": "poi.park",
"elementType": "labels.text.fill",
"stylers": [{"color": "#616161"}]
},
{
"featureType": "poi.park",
"elementType": "labels.text.stroke",
"stylers": [{"color": "#1b1b1b"}]
},
{
"featureType": "road",
"stylers": [{"visibility": "off"}]
},
{
"featureType": "road",
"elementType": "geometry.fill",
"stylers": [{"color": "#2c2c2c"}]
},
{
"featureType": "road",
"elementType": "labels.text.fill",
"stylers": [{"color": "#8a8a8a"}]
},
{
"featureType": "road.arterial",
"elementType": "geometry",
"stylers": [{"color": "#373737"}]
},
{
"featureType": "road.highway",
"elementType": "geometry",
"stylers": [{"color": "#3c3c3c"}]
},
{
"featureType": "road.highway.controlled_access",
"elementType": "geometry",
"stylers": [{"color": "#4e4e4e"}]
},
{
"featureType": "road.local",
"elementType": "labels.text.fill",
"stylers": [{"color": "#616161"}]
},
{
"featureType": "transit",
"elementType": "labels.text.fill",
"stylers": [{"color": "#757575"}]
},
{
"featureType": "water",
"elementType": "geometry",
"stylers": [{"color": "#000000"}]
},
{
"featureType": "water",
"elementType": "labels.text.fill",
"stylers": [{"color": "#3d3d3d"}]
}
]
--------------------------------------------------------
static link content:
https://maps.googleapis.com/maps/api/staticmap?key=YOUR_API_KEY�er=49.73107033339472,55.50440063476559&zoom;=3&format;=png&maptype;=roadmap&style;=lightness:45&style;=element:geometry%7Ccolor:0x212121&style;=element:labels.icon%7Cvisibility:off&style;=element:labels.text.fill%7Ccolor:0x757575&style;=element:labels.text.stroke%7Ccolor:0x212121&style;=feature:administrative%7Celement:geometry%7Ccolor:0x757575&style;=feature:administrative.country%7Celement:labels.text.fill%7Ccolor:0x9e9e9e&style;=feature:administrative.locality%7Celement:labels.text.fill%7Ccolor:0xbdbdbd&style;=feature:poi%7Celement:labels.text.fill%7Ccolor:0x757575&style;=feature:poi.park%7Celement:geometry%7Ccolor:0x181818&style;=feature:poi.park%7Celement:labels.text.fill%7Ccolor:0x616161&style;=feature:poi.park%7Celement:labels.text.stroke%7Ccolor:0x1b1b1b&style;=feature:road%7Cvisibility:off&style;=feature:road%7Celement:geometry.fill%7Ccolor:0x2c2c2c&style;=feature:road%7Celement:labels.text.fill%7Ccolor:0x8a8a8a&style;=feature:road.arterial%7Celement:geometry%7Ccolor:0x373737&style;=feature:road.highway%7Celement:geometry%7Ccolor:0x3c3c3c&style;=feature:road.highway.controlled_access%7Celement:geometry%7Ccolor:0x4e4e4e&style;=feature:road.local%7Celement:labels.text.fill%7Ccolor:0x616161&style;=feature:transit%7Celement:labels.text.fill%7Ccolor:0x757575&style;=feature:water%7Celement:geometry%7Ccolor:0x000000&style;=feature:water%7Celement:labels.text.fill%7Ccolor:0x3d3d3d&size;=480x360 |
|
Juerg
7/17/2017 15:33 | Sandip,
we have now added the new �styles� option (to be added to the web part�s �Options� setting) to allow you to add your map styles as illustrated below by appending the JSON right after the �styles=�:
styles=[
{"stylers": [{"lightness": 45}]},
{"elementType": "geometry","stylers": [{"color": "#212121"}]},
{"elementType": "labels.icon","stylers": [{"visibility": "off"}]},
{"elementType": "labels.text.fill","stylers": [{"color": "#757575"}]},
{"elementType": "labels.text.stroke","stylers": [{"color": "#212121"}]},
{"featureType": "administrative","elementType": "geometry","stylers": [{"color": "#757575"}]},
{"featureType": "administrative.country","elementType": "labels.text.fill","stylers": [{"color": "#9e9e9e"}]},
{"featureType": "administrative.locality","elementType": "labels.text.fill","stylers": [{"color": "#bdbdbd"}]},
{"featureType": "poi","elementType": "labels.text.fill","stylers": [{"color": "#757575"}]},
{"featureType": "poi.park","elementType": "geometry","stylers": [{"color": "#181818"}]},
{"featureType": "poi.park","elementType": "labels.text.fill","stylers": [{"color": "#616161"}]},
{"featureType": "poi.park","elementType": "labels.text.stroke","stylers": [{"color": "#1b1b1b"}]},
{"featureType": "road","stylers": [{"visibility": "off"}]},
{"featureType": "road","elementType": "geometry.fill","stylers": [{"color": "#2c2c2c"}]},
{"featureType": "road","elementType": "labels.text.fill","stylers": [{"color": "#8a8a8a"}]},
{"featureType": "road.arterial","elementType": "geometry","stylers": [{"color": "#373737"}]},
{"featureType": "road.highway","elementType": "geometry","stylers": [{"color": "#3c3c3c"}]},
{"featureType": "road.highway.controlled_access","elementType": "geometry","stylers": [{"color": "#4e4e4e"}]},
{"featureType": "road.local","elementType": "labels.text.fill","stylers": [{"color": "#616161"}]},
{"featureType": "transit","elementType": "labels.text.fill","stylers": [{"color": "#757575"}]},
{"featureType": "water","elementType": "geometry","stylers": [{"color": "#000000"}]},
{"featureType": "water","elementType": "labels.text.fill","stylers": [{"color": "#3d3d3d"}]}
]
Please re-download the updated Zip file, extract the WSP file and then update the web part solution. |
|
Sandip Ukani
3/3/2018 21:29 | Hi Juerg, thanks for adding the styles section, it works well. I was wondering if it was possible to run some javascript when a pin is clicked (i.e override the info bubble). I would like it to navigate to anther sharepoint page, but update a list entry prior to doing that. |
|
Juerg
3/7/2018 16:33 | Sandip,
You now can add your custom JavaScript via the new �clickhandler� option (to be added to the web part�s �Options� setting).
Please note that the content of the �Info Bubble Template� is available via the �tip� JavaScript variable as illustrated by the below simple example:
clickhandler=alert(tip);
Please re-download the updated Zip file, extract the WSP file and then update the web part solution. |
|
Tomek
3/15/2018 01:01 | Hi Juerg,
Any plans to have this webpart for SharePoint Online / Office 365?
Thanks |
|
Juerg
3/15/2018 11:17 | Tomek,
we are actually concerned regarding the Google Maps usage on Sharepoint Online on pages that are not available to the public (please see https://developers.google.com/maps/documentation/javascript/get-api-key ).
It looks like you might need to purchase a �Premium Plan� from Google so you first might want to contact them to clarify the license situation.
|
|
Tomek
10/4/2018 05:16 | Hi Juerg,
Is there any way to globally assign google API key instead of going to each webpart and adding it there? I have many subsites with maps and would need to script it to populate the key, is there an easier way?
Best,
Tomek |
|
Juerg
10/4/2018 10:54 | Tomek,
you can now specify the Google API key on an application-wide basis by adding the following new line to the AppSettings section of your web applications�s web.config file:
<appSettings>
.
.
<add key="AE_GoogleMapsKey" value="yourAPIkey" />
</appSettings>
Please re-download the updated Zip file, extract and then update the solution. |
|
Tomek
10/8/2018 23:43 | JHi Juerg,
I am getting rthe following error on most (not all) geo coding webpart sites
Error Accessing the Google Geocoding service: The remote server returned an error: (403) Forbidden.
Have you seen this problem? is this related to an old API v2 vs v3 used? |
|
Tomek
10/9/2018 01:54 | Hi Juerg,
I think the error I am getting is related to google API key. The global entry AE_GoogleMapsKey does not work with geocoder. When I entered my APIkey on the geocoder webpart , I was able to see generated addresses, however I got another error:
123 street address, City, State , ZIP
Your request was denied, generally because of lack of a sensor parameter. |
|
Tomek
10/9/2018 01:58 | can sensor parameter (looks like google requires it true or false) be set globally and google API key too for GeoCoder webpart? |
|
Juerg
10/9/2018 11:09 | Tomek,
Google just recently changed its policy and now requires you to enable billing when using the Google Maps platform API:
https://cloud.google.com/maps-platform/pricing/
Please note that your account will most probably not be charged since Google gives you a $200 monthly credit which covers up to 28,500 page views per month.
We thus updated the "Geocoder" web part to allow you to enter your Google API key.
Please re-download it and the update the web part solution.
A good overview on how to get your API key (to be entered into the web part�s �Google API Key� setting) and to enable billing can be found here:
https://elfsight.com/blog/2018/06/how-to-get-google-maps-api-key-guide/ |
|
Leanne
12/11/2018 01:54 | The cost of $200 for licence per server - does that include a development server and training server or is it just per Production server? |
|
Juerg
12/11/2018 09:41 | Leanne,
the license is per production Sharepoint web frontend server. |


 We have had no problems, so we are pleased with the web part. The configuration was very easy.


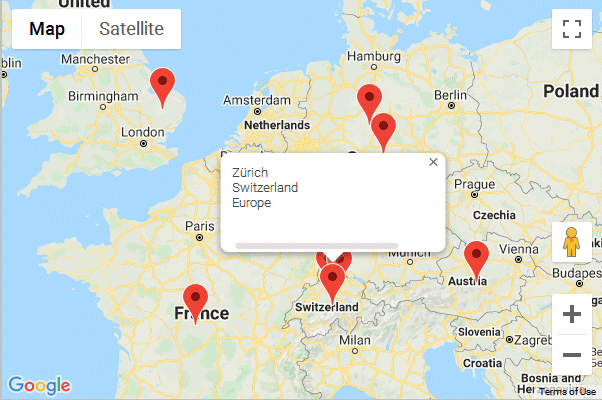

 Geo Mapper Web Part Installation Instructions


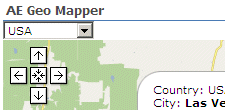
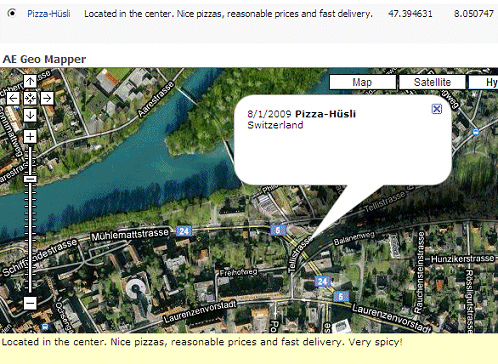
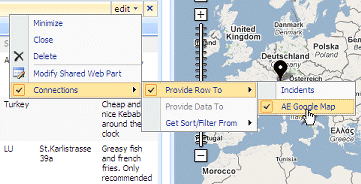
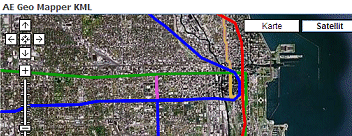
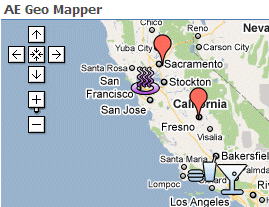
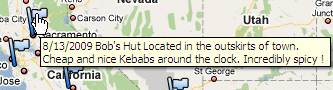
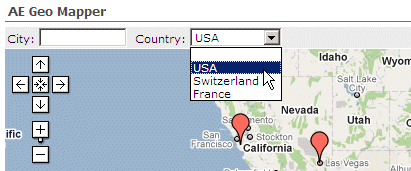
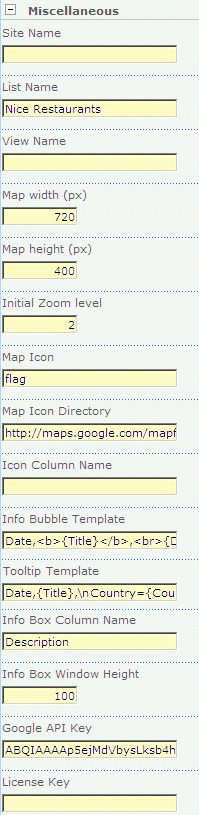
 Post a Comment